
You know, the old Jaguars are just lovely. They are truly automotive art. Sir William’s eye to depict the perfect curvature for a vehicle, in the era before computerised air foil dynamic programmes and calculations was truly inspiring. Couple this with the amazing XK engine and there is no equal in the world (maybe I’m biased?).
However, the original Smiths gauges are poorly lit and very difficult to read at night, as I discovered when driving my Mark 2 one evening.
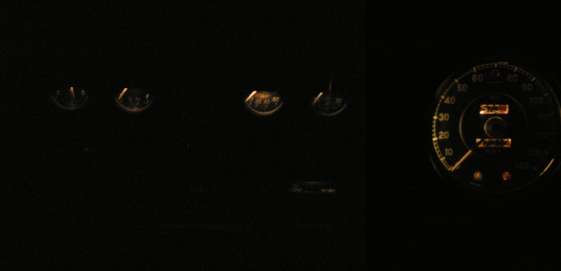
Dashboard lighting before “upgrade”
So, just like Grant Rodman, I too wanted to improve the lighting in my dash. What to do then?
After some internet research, I realised that the advent of LED (Light Emitting Diodes) lighting has made conversion to 12V, low power draw, coloured lights a very real and easy alternative.
After some research, I rediscovered some of the principles of lighting and pitfalls of simply purchasing LEDs without knowing the basics. For the benefit of the reader, I’ve outlined some of the key points below:
- Incandescent bulbs work by heating a wire (element) encased by glass in a vacuum (thank you Mr Edison). The vacuum avoids the wire melting. As such, the direction of current flow is irrelevant (ie there is no polarity).
- LEDs are a diode. Hence, the current only flows in one direction. They are polarised.

- Due to (2), be very careful that you are selecting the correct LED for your vehicle. This is particularly important if you are putting an LED into a car that is still positively earthed.
So, with the basic theory revisited, time to pull out the incandescent bulbs and get some measurements. The intention was to simply replace the incandescent bulbs with the LEDs. As such, one needs to ensure the new bulbs will fit the housing.
The Mark 2 has a simple Edison screw (E10), so very easy to replace. When pulling the bulbs, I discovered the blue plastic lens for every bulb had melted. As such, the dash had that dull, red/orange glow. As LEDs are available in various colours, I thought it would be lovely to put cool, blue LEDs in its place; essentially bringing it back to original colour, but with modern fittings.
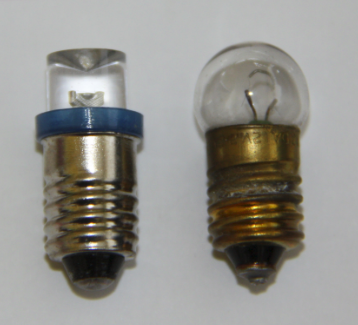 Measurements of the incandescent bulb were taken and web surfing began. I needed 8 LEDs for the dash and nearly made the mistake of simply getting the cheapest I could find (there are plenty out there!). Don’t to this!! Nearly all the E10 screw LEDs on the market will be too long to fit in the housing due to the physical size of the LED itself. Ultimately, I located an inverted LED from the UK. As such, I was able to easily replace the 2.2W Mazda bulbs (yup – that’s what was stamped on the incandescents when they were removed) with equivalent E10 blue inverted LEDs.
The actual replacement couldn’t have been easier (compared to some of the other jobs J).
- Disconnect the battery!! (I haven’t always done this – to my peril. 12V isn’t too bad on the body, but it destroys instruments when shorted-out)
- Lift down the instrument panel
- Remove the bulb housing
- Unscrew the bulb and screw-in the LED
The tachometer and speedo are a little trickier. Two bulbs in each. I found it’s possible to get the bulbs out from behind without removing the panel itself. It’s a bit of a squeeze laying on your back in the footwell, but all done in ~20mins.
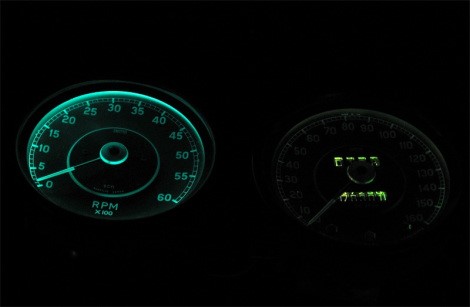
So – how does it look now?
The images below are my attempt to show how the result of this conversion. It was interesting to discover that what I was hoping were a few failed bulbs, is actually a wiring issue I need to resolve, as I (still) have no lighting to either bulb at the tachometer. This is a job for another day.
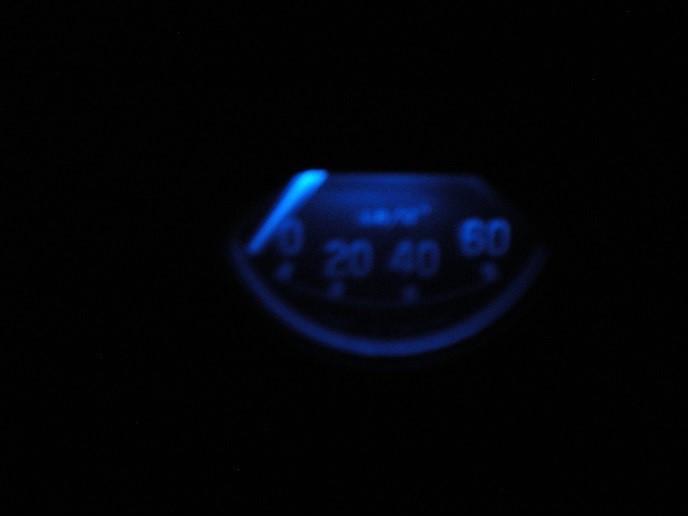
Oil pressure gauge LED lighting.
Hopefully, the pictures show that the lighting is still quite dim, though now has a lovely blue glow to it.
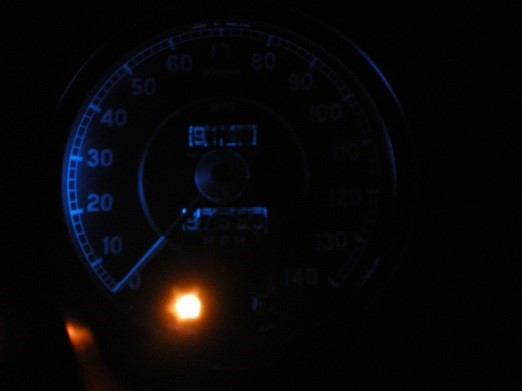
Speedometer with LED lighting
(ignition light shining orange).
What to do? In retrospect, I would have looks for greater equivalent wattage from the available LEDs (if possible).
However, my ultimate solution is to use LED strip lighting. This requires the gauge to be removed and disassembled – so is more involved. However, the results appear to be outstanding with multiple web forums showing great success, particularly on E-types in the USA.
– Danny Taylor
Possible outcome with strip LED lighting.
(Image from https://jaguaretype.wordpress.com/home/technical/dash-instrument-lighting-upgrade/)
![]()